This two-part guide takes you through the main steps to learning the whistle.
The parts are summarised below.

Parts of my whistle
Note that most whistles
don't have a tuning slide.

This introduction to the whistle covers the basics like:
* buying a whistle,
* how to hold it and finger the notes,
* playing some simple tunes by ear.
Building on Part A, the aim here is to work on playing more fluently with a nice tone. You will also learn a bit about musical notation and access a selection of traditional tunes to play along with.

Part A

my whistle collection

Recorder, Feadóg and Clarke

Generation and Walton

This tunable whistle can be adjusted by sliding the barrel out or in.
In my opinion, a whistle (aka penny whistle, tin whistle) is the perfect starter instrument for any child or adult who wants to make music for the first time. Here are some reasons:
* with only six holes, it is easy to play,
* it is small enough for a young child's fingers to be able to reach the holes,
* it is inexpensive (let's not call it 'cheap'!),
* it is a great instrument to learn to play by ear. In just a few weeks, most people can knock out a few popular tunes,
* if you're into Irish Traditional Music (ITM), the whistle provides a quick introduction to the many hundreds of rollicking jigs, reels and hornpipes that are commonly played at music sessions,
* It gives you a solid platform from which to move on to a more sophisticated instrument at some future date, should you wish to.
What size of whistle should I buy?
As you can see from the photo of my whistle collection, whistles come in all sizes. The size of a whistle (actually the volume of the barrel) is what determines its key—the larger the whistle, the lower the pitch.
As you'll discover later, most whistle tunes are played in the keys of D or G. To make it easy to play in these keys, I suggest that you start off with a high (aka soprano) D whistle—you can explore other sizes and keys later.
How much should I spend?
Whistles cost anything from £5 to several hundred pounds. For your first whistle, you can get a decent one for under £10.
There are a huge number of good starter whistles on the market. Here are five that are easy to play and have a pleasant tone. They won't break the bank (in fact, they all cost less than £10) and are available in the preferred key of D. They are listed below with links to their details in Amazon UK.
1. Recorder Workshop 922D
2. Feadog
3. Clarke
4. Generation
5. Walton
Sometimes a whistle is slightly out of tune with other instruments—it may sound 'flat' (meaning that the pitch is lower than it should be) or it may sound sharp (i.e. the pitch is higher than it should be).
If you have this problem, can anything be done to fix it?
Here are two simple fixes to try first.
(a) Warm it up: when a whistle is cold, it tends to play flat. So one way of raising its pitch (slightly) is to warm it up by giving it a brisk rub with the tail of your shirt (other garments can also be used).
(b) Clear the airways: place a finger over the fipple (the little window in the mouthpiece) and give the whistle a hard, sustained blow. This has two benefits:
- it clears out any spit (in Whistleland we refer to this as 'condensation'!) that may have collected,
- your breath will warm the body of the whistle.
If these two tricks don't solve the problem then, unless you have a 'tunable' whistle, there's not much that can be done.
What's a tuneable whistle? It is a whistle that allows you to adjust the length of the barrel which in turn alters the tuning of the instrument. Extending the barrel lowers the pitch while shortening the barrel raises the pitch. The tuning slide is hard to spot but if there is one, you'll find it on the barrel between the mouthpiece and the finger holes.
Of the five starter whistles listed here, only the Recorder Workshop model is tuneable. And at a price around £5, this makes it a cracking buy!
When you first start playing the whistle, it's surprising how often it can slip through your fingers and end up on the floor! The reason is that you may not yet have mastered the art of keeping a grip on it while at the same time avoiding placing your fingers over inappropriate holes.
Paradoxically, the trickiest note in this respect is also the note that is easiest to play. This is the note called c# (c sharp). Because c# is played with all the holes open, it can be hard to keep a secure hold of the whistle while avoiding putting fingers on or near some of the holes. The photo opposite shows me playing c#. I'm supporting the whistle using two thumbs at the back and the fourth finger of my right hand is steadying it from above. Note that this finger is out of harm's way, placed well below the bottom hole.
However, don't worry about this—it will get easier with practice.
Next, a few more general tips about holding the whistle.

Playing a c# without dropping it!
As it happens, the choice of which hand should go uppermost isn't critical when playing the whistle. However, most other keyed musical instruments (e.g. recorder, clarinet, saxophone, …) have additional holes and keys which require you to play 'left over right'. So, since the choice for the whistle is fairly arbitrary, my advice is to stick to this 'left above right' convention—you'll thank me for this piece of advice when you are chosen to play lead clarinet in the Royal Philharmonic Orchestra in your next life.

left hand above

flat fingers—a better shape that lets you cover the holes

arched fingers make it difficult to cover the holes completely
For your first lesson, I suggest that you start off using just the fingers of your left hand. This will enable you to play the following notes:
c#, B, A and G.
Use the chart shown here to find these notes and practice playing each one in turn with the cleanest sound you can manage.
Start off playing the four notes downwards (c#, B, A and G) and then back up again (G, A, B and c#).
If you find it helpful, click the audio player below and play along with me. The recording is on a loop so you'll probably run out of steam before I do!
And by the way, please use the speed controller on the right of the player—start off slowly and gradually pick up speed.
c#, B, A, G

Four easy notes to get you started
The overall aim is to get a beautiful sound from your whistle, avoiding squeaks and shrieks.
Here are three tips that you'll need to work on.
* make sure you cover each hole completely,
* keep unused fingers well away from holes that are meant to be open.
* try to blow with an even breath—if you don't blow hard enough, it can sound thin and reedy and if you blow too hard the note can sometimes jump into a higher register.

Watch out, there's a tin whistler about!
With the first four notes under your belt, it's time to start using both hands. Try playing all the notes in the lower register, first going down the scale and then going up.
c#, B, A, G F#, E, D.
These are shown on the Whistle Fingering Chart.
As you play these seven notes, you'll probably feel that it sounds incomplete. The missing note is at the top of the scale and is called 'd'. Note that this note is usually written in lower case—i.e. as 'd' rather than 'D'—in order to distinguish it from the bottom note, D.
Running from highest to lowest, the eight notes are:
d, c#, B, A, G F#, E, D.
These eight notes are referred to as the scale of D.
The Scale of D:
d, c#, B, A, G, F#, E, D

If you look closely at the Fingering Chart, you'll see that there are actually nine notes displayed, not eight. I've thrown in an extra one, the note c. Although c is not included in the scale of D, it is a note that you will need to learn.

By now you probably just want to have a go at playing a tune on your whistle. I've recorded the tune 'Merrily We Roll Along' to get you started. Your first note is F# (played with two holes open at the bottom).
The tune is provided below as an audio recording.
- Play my audio recording several times until you can sing along to it.
- Set the speed controller to a slow setting and then do your best to play along, using the note names as a guide. The Whistle Fingering Chart is also included, should you need it.
- As your fingering skills start to get better, increase the tempo on the speed controller and try again. Keep going until you can play it at a normal speed with the controller set to 1.0.

F# E D E F# F# F#
E E E F# A A
F# E D E F# F# F#
E E F# E D
You've just been playing 'Merrily we Roll Along' in the key of D.
Now you can play the same tune but this time in a higher key—the key of G.
Here are the eight notes that form the G scale:
G, A, B, c, d, e, f#, g
As you can see, this scale takes you into the upper register.
Now have a go at playing 'Merrily We Roll Along' in the higher key of G. This time your first note is B (with just the top hole covered).

B A G A B B B
A A A B d d
B A G A B B B
A A B A G
Playing the nine basic notes on the whistle
The chart below shows the fingering for the nine basic notes which are on the lower register. Practice playing them cleanly and try to remember their names.
Remember that the highest note in the chart, 'd', is the same as the lowest note, 'D', but one octave above.
If you only ever play tunes by ear and on your own, you may never need to know and remember the names of the notes. However, in the real world, there will come a point when you'll need to know the names of the notes and now would be a good time to get them into your head.
When you think you have a grasp of these note names, have a go at the Whistle Fingering Chart Quiz. You might like to try the quiz several times until you're satisfied that you can identify all nine notes every time.
Score:
Ranking:
The notes lying above 'd' are similar to the notes in the lower register. However, in order to distinguish these two sets of notes, the notes in the upper register are usually written in lower case. Remember that you need to blow harder to play these higher notes.
When you get to the higher end of the second register, the top three notes, marked c', c#' and d' on the chart are hard to blow so don't worry too much about them at this stage. Fortunately they don't crop up very often in traditional music!
The chart below sets out the note names for notes in the upper register.

Blow harder to play
the higher notes.

Spend some time now practising playing the first six of these upper register notes:
d, e, f#, g, a and b.
You should now be familiar with 14 important notes in the two registers combined.
Here they are again:
D, E, F#, G, A, B, c, c#, d, e, f#, g, a, b
Remember that the notes written in capitals (G, B and so on) are the lower register notes. Notes written in lower case are the upper register notes.
This would a good opportunity to spend a few minutes trying to play each note and remind yourself of its note name. You can refer back to the note charts if required.
In three cases, I've included two versions of each tune—one in the key of D and the other in the key of G.
Tune List:
- Twinkle Twinkle Little Star (in D and G)
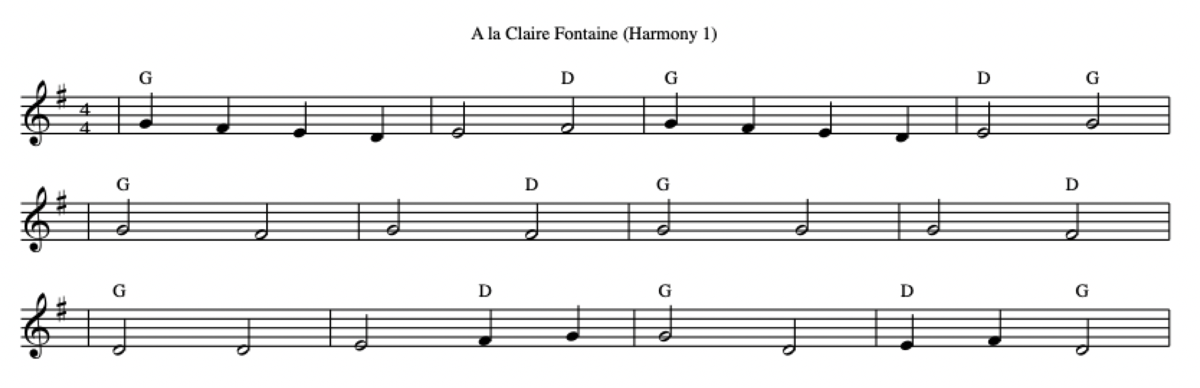
- Au Clare de la Luna (in G and D)
- Frère Jacques (in D)
- Egan's Polka (in G)
- You are my Sunshine (in G)
- The Skye Boat Song (in G and D)
D D A A B B A
G G F# F# E E D
A A G G F# F# E
A A G G F# F# E
D D A A B B A
G G F# F# E E D

G G d d e e d
c c B B A A G
d d c c B B A
d d c c B B A
G G d d e e d
c c B B A A G

G G G A B A G B A A G
G G G A B A G B A A G
A A A A E E
A G F# E D
G G G A B A G B A A G

|: d d d e f# e d f# e e d :| (x2)
e e e e B B
e d c# B A
d d d e f# e d f# e e d

G A B G G A B G
B c d B c d
d e d c B G
d e d c B G
G D G G D G

B D E D B D E D
G A B A G E D
B D E D B D E D
G A B A G G
B d B A A G E D
G A B A G E D
B d B A A G E D
G A B A G G

D G A B B
B A B G G
G A B c e
e d c B
G A B c e
e d c B G
G A B c A A B G

[aka Speed Bonny Boat]
D E D G G A B A d
B A B E E D
D E D G G A B A d
B A B E E G
:B G B B A E A A
G E F# G G E : x2
D E D G G A B A d
B A B E E D
D E D G G A B A d
B A B E E G

[aka Speed Bonny Boat]
A B A d d e f# e a
f# e f# B B A
A B A d d e f# e a
f# e f# B B d
:f# d f# f# e B e e
d B c# d d B : x2
A B A d d e f# e a
f# e f# B B A
A B A d d e f# e a
f# e f# B B d

d d d B c d c B
G A B G F# E D
d c B A B D E F# G A B
B A B c F# G A G

F# A B B B A B d d e
d e f# e d B A F# A
d c B B B A B d d e
d e f# e d B B B
f# a f# f# e d e e e
d e f# e d B A F# A
d c B B B A B d d e
d e f# e d B B B

(Ned of the Hill)
B G E F# G
G A B g f# e
f# e d B A G
A B c B A G E
B G E F# G
G A B g f# e
f# e d B A G
A B A G F# G
d e c g d B
d e f# e d
d d B A G
A B c B A G E
B G E F# G
G A B g f# e
f# e d B A G
A B A G F# G
|G F# E D|E F#|G F# E D| E G|
|G F#| G F#| G G| G F#|
|D D| E F# G|G D|E F# D |
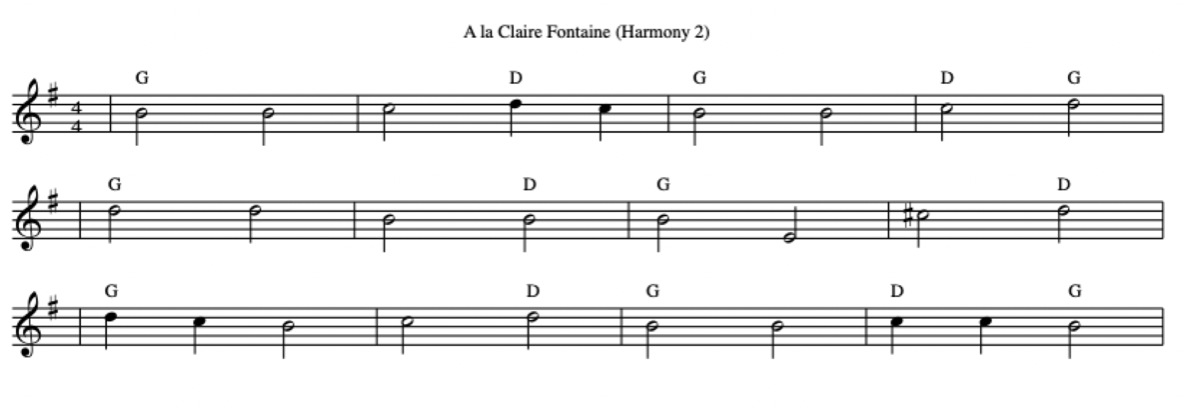
|B B|c d c|B B|c d|
|d d|B B |B E |c# d|
|d c B |c d |B B | c c B |

G G B B A B A
G G B B A B
B B A G B d B
d d B G B A
G G B AG B G
B B AG B A G
M'en allant promener,
J'ai trouvé l'eau si belle,
Que je m'y suis baignée.
Il y a longtemps que je t'aime
Jamais je ne t'oublierai.


Part B
This tunable whistle can be adjusted by sliding the barrel out or in.
Tips from Part A
I suggested a number of tips in Part A. Here's a quick summary.
* Buying a whistle—the first whistle you buy should be a soprano (high) D,
* Grip—stick to the convention of holding the whistle with left hand above right,
* Fingering—learn to cover the holes completely by keeping fingers flat and don't allow unused fingers to stray close to open holes,
* The bottom note on a D whistle (with all the holes closed) is D. The notes going up the scale of D are:
D, E, F#, G, A, B, c#, d
* The upper register—blow harder to get these higher notes. They are usually written using lower case letters (i.e. 'e', 'a' and so on).
* Flat?—if your whistle sounds flat, try warming it up by giving it a brisk rub with a piece of cloth. Also, try blowing a bit harder to raise the pitch slightly (but avoid over-blowing).
* Spit—clear out any 'condensation' by placing a finger over the fipple and giving the whistle a hard blow.
* Adjusting the tuning—some whistles have a tuning slide on the barrel. Lengthen the barrel to lower the pitch and shorten the barrel to raise the pitch.
* Playing by ear—before worrying too much about musical notation, start off by playing a few simple tunes by ear.
Some more tips
Here are a few more suggestions.

sticky tape
Here's a trick for greatly reducing the volume of sound and so protecting the ears of the innocent. Take a short strip of sticky tape and place it over the lower half of the fipple (the little window in the mouthpiece where the sound comes out). The precise positioning is critical—cover too little and it will still sound loud; cover too much and you won't hear yourself playing at all.

the three keys to success

play along to a recording
The most obvious way of developing your technique and keeping your fingers fluid is to play lots of tunes. Crucially, this will train your fingers to become comfortable with playing a wide range of musical phrases that recur in many other tunes.
When it comes to working on a new piece, I find that being able to read from a written score is a big advantage. Once I think I've got the notes under my fingers, I put the music away and work on playing it by ear. Without the distraction of following the musical score, I can concentrate on making my playing more musical.
Playing along with a recording is also helpful, particularly as it forces you to maintain a steady tempo. I use an app called Capo (Mac, iPad and iPhone only). This clever software allows the user to adjust the tempo and key and much else besides; it also lets you create short sections that can be looped repeatedly, which is handy for helping you to master a particularly tricky bit.
When you feel that your fingers have mastered the notes of a new tune, start to think about introducing a little bit of variety into your playing. In particular, when parts of a tune are repeated, find ways of making some small variations second time through. A way of doing this is to experiment with the use of embellishments known as ornamentation. Ornamentation is common in most musical genres but is a particular feature of Irish music and examples are given in the next section.
Peter Mitchell
You'll find some more useful tips to make your whistle sound better from 'sound adventurer' Peter Mitchell.
If you wish to experiment with ornamentation, make sure that you …
… have the tune worked out in your head before starting to decorate it,
… keep a steady tempo (if you try to play too fast, your ornamentation will unbalance the basic tune).
… try to vary your ornamentation so that repeated sections still sound fresh,
… don't overdo it!
What are the main techniques of ornamentation?
There are many ways in which you can decorate a tune. Here are six.
1. tonguing,
2. using vibrato,
3. the slide,
4. the cut and the tap,
5. the roll, and
6. the cran.
These are explained below.

ornaments are used to decorate a tune

Tonguing is using your tongue when playing the whistle. You can do this by saying "Tuh" as you blow a note. Try to avoid touching the mouthpiece with your tongue—instead, touch the tip of your tongue on the palate of your mouth.
So why bother tonguing?
A key benefit of tonguing is that it is a way of getting a clean note. Here are some pointers:
- you should always tongue after you have taken a breath and this includes the very first note of the tune.
- you need to tongue when you're playing the same note two or more times in succession. In this situation, tonguing is an easy way of splitting the note into separate notes of the same pitch.
- it's a useful technique to use to avoid squeaks when you jump from lower to upper octave (for example, try playing E followed by e, or G followed by g).
But the main advantage of tonguing is to give accent and shape to the music.
Don't overdo tonguing! Beginners sometimes try to tongue every note and this can sound jerky and unmusical. There are often parts of certain tunes where the music should flow smoothly (this style of playing is called 'legato') and to play the legato sections nicely you should try to avoid tonguing if possible.

My advice with tonguing is that less is more!

Vibrato on the note G
I'm vibrating the fingers of my right hand close to the open holes.
If you're playing a tune containing long, sustained notes, it can sometimes sound mechanical and boring. To make a held note more interesting, you can fluctuate the air coming out of the whistle so that the note vibrates in a wave—hence the name, vibrato.
There are two common ways of creating this effect.
(a) By fluctuating your blowing: some players talk about doing this using their diaphragm while others say they use their throat. You really need to watch someone using 'blowing vibrato' and then try to copy what they do. It may be a skill that you eventually stumble upon and when you do, hang onto it!
Click to listen to a classical flute player, Matthew Roitstein, talking about how he achieves this effect with his blowing.
(b) Using finger vibrato: among whistle players, vibrato is more commonly achieved using the fingers. Try wafting your spare fingers close to the hole and experiment to get the effect you want. But as with all these effects, try not to overdo it!
Watch the video where I demonstrate both types of vibrato.
Will Ye Go Lassie Go
As the name suggests, a slide involves sliding your finger slowly across a hole so that the note slides up from one note to the next.
Listen to the audio where you'll hear me play two slides:
* from the second note (A) to the next (B) and
* from the tenth note (d) to the next (e).
Tune: Will Ye Go Lassie Go
G A B B A G E G
B d e e e d B d

two types of grace notes—cut and tap
Cuts and taps are also referred to as 'grace' notes.
A grace note is a single very short note inserted immediately before the main note being played.
The cut
In the case of the cut, the grace note is played above the main note. But we need to be more precise—which note should I play as the grace note? There are different ways of playing a cut. Below I explain the two most commonly used—the Simple Cut and the Traditional Cut.
The Simple Cut
Choose as the grace note the note immediately above the main note that you are playing.
For example:
if you are playing a G, the grace note will be A,
if you are playing e, the grace note will be f#,
if you are playing a B, the grace note will be c#.
and so on
The Traditional Cut
Here the rule of thumb is a bit more complicated as the choice of grace note will depend on what main note you are playing. In general, it involves lifting either the third finger or the first finger of the left hand to make the grace note—i.e. play the grace notes using either A or c#.
So …
… if I'm playing D, E, F# or G… my choice of grace note is A.
… if I'm playing A or B … my choice of grace note is c#.
… if I'm playing c# … my choice of grace note is d.
The Tap
In the case of the tap, the choice of grace note is much more straightforward—it is the note immediately below the main note.
Watch the video where you'll hear me demonstrate these two ornaments. Then I'll play them in the tune, Will Ye Go Lassie Go, as follows:
(a) the cut precedes the 4th note (B) and the grace note is c#,
(b) the tap precedes the 12th note (e) and the grace note is d.
Tune: Will Ye Go Lassie Go
G A B B A G E G
B d e e e d B d

the 5-note roll
If you don't feel that a single grace note quite matches the extravagance of your mood, you could try playing a roll instead. Rolls are ornaments consisting of five notes. As with all ornamentation, the grace notes are played very quickly.
The choice of which notes to play can vary but here are the two most commonly used types of roll.
(a) The simple roll:
Start and finish with the main note and in between these first and last notes, play:
… up one note
… return to the main note,
…go down one more note,
before finally returning to the starting note.
Here are a couple of examples of this simple roll.
Simple roll on G: G A G F# G
Simple roll on B: B c# B A B
(b) Cut + Tap
A slightly more sophisticated form of roll is to play a cut followed by a tap. As with the simple roll, it starts and ends with the main note.
Here are a couple of examples (grace notes marked in blue).
roll on the note E: E A E D E
roll on the note G: G A G F# G
roll on the note A: A c# A G A
Watch the video where you'll hear me play both type of roll.
After that I'll play two rolls in the tune, Will Ye Go Lassie Go. They appear…
… on the third note (B) where I play: B c# B A B, and
… on the 11th note (e) where I play: e a e d e.
Tune: Will Ye Go Lassie Go
G A B B A G E G
B d e e e d B d

Tanner Bayles explains the cran
The cran is one of the more sophisticated decorations and derives from ornamentation used by uilleann pipers. Click here for a very clear explanation by Tanner Bayles of how to play the cran.

Some useful YouTube links
Two from 'CutyPie'
https://www.youtube.com/watch?v=7FtVhuC-110
https://www.youtube.com/watch?v=SuMh7foZrOs
From whistletutor
https://www.youtube.com/watch?v=YwZA_Vyv7p0
D, E, F#, G, A, B, c, c#, d, e, f#, g, a, and b
The notes in the lower register are usually written using capitals (D, E, G and so on) while the upper register notes are written in lower case (d, e, g and so on).
Writing out notes using upper and lower case letters is a good starting point with getting to grips with music notation and it is the basis of a popular computer notation system called ABC which is outlined below.

perfectly logical!
An example of ABC notation for the Irish tune 'Saddle the Pony" is shown here. As you can see, the top four lines comprise four header fields which set up important features of the music overall. In this example, these are:
X: the tune number,
T: the title,
M: the time signature (i.e. its underlying rhythm, which in this case is a jig), and
K: the musical key that it has been written in (in this case the key is G).
The remaining lines contain the notes and their durations. As you can see, all the notes are written as letters, some in upper case and some in lower, indicating lower and higher register, respectively.
Durations are indicated using numbers.
Here's an example.
E2 d B4 g/ means:
- hold E for 2 beats,
- hold d for one beat,
- hold B for 4 beats
- hold g for half a beat.
If you'd like to find out more about ABC notation, here's a straightforward explanation of the basic features provided by The Celtic Room.

An example of a tune
in ABC Notation
Fingering Chart: basic notes
Fingering Chart: upper register notes
If you want to go further with reading music on the tin whistle, there are some musical terms that you should be familiar with. Have a look at the picture shown here which lists a few important musical terms. If you're unsure about what some of them are, click below to find my quick summary of what they mean and how they are linked to the written musical notation that a tin whistle player might use.
Click here.

Some important musical terms
There are two simple ways of reading music that you may already be familiar with—using tabs and using letters.
Tabs are little pictures of a whistle indicating what notes to play according to which holes are closed and which open. This notation requires no musical knowledge, not even knowing the names of the notes, but of course tabs are burdensome to write out and rather slow to read.
Letters simply involves writing out the letter names of each note. This method is a bit more sophisticated than using tabs—easier to write out and quicker to read but you do need to know the names of the notes.

Tin whistle tabs
D D E D G F#
Notation using letters
The two most important things you need to know about a note are:
duration—how long it lasts,
pitch—how high or low it is.
For a tune written in standard musical notation, these two elements are dealt with as follows.
- Duration is indicated by the shape of the note.
This is covered in Step 5, Duration of a note.
- Pitch is shown by the position of where the note is placed on the five-line stave—a high note is placed near the top of the stave while a low note is shown near the bottom.
This is covered in Step 6, Pitch of a note.
No doubt you have already come across standard musical notation as shown here with the tune Happy Birthday. It is also sometimes referred to as:
- stave (UK)
- staff (US)
- music score
If you're not able to read musical notation satisfactorily, don't worry because help is at hand …
The next two sections explain how notes are written (Step 5) and how the pitch of a note is represented by its position on the five-line stave (Step 6).

Happy Birthday in standard music notation
Duration—how long a note lasts
The chart titles 'The note names' shows the note durations along with their names. As you can see, there are two sets of names, those used in the North America and those used in the UK. Although I was brought up with the UK system, I plan to follow the US terminology as it is both easier to grasp and to remember.
The five most common note shapes are shown in the table, 'The Note Names'.
As is indicated by the green shaded row, these five types of note centre around the 'quarter note', or quaver, which has a duration of 1 beat.
The durations of the other notes follow from this starting point:
* the half note lasts twice as long as the quarter note,
* the whole note lasts four as long as the quarter note,
* the eighth note lasts half as long as the quarter note,
* the sixteenth note lasts a quarter as long as the quarter note.

The note names

Placing a dot after a note has the effect of increasing its duration by half of the note's value (i.e. by 50%).
Some examples are shown in the table.
A whole note has 4 beats, so …
… a dotted whole note has 4 + 2 = 6 beats.
A half note has 2 beats, so …
… dotted half note has 2 + 1 = 3 beats.
A quarter note has 1 beat, so …
… a dotted half note has 1+ ½ = 1½ beats.
A eighth note has ½ a beat, so …
… a dotted eighth note has ½ + ¼ = ¾ beat.

a dotted note lasts half as long again
Now that you can identify the five different note shapes and know about dotted notes, you should be ready to look at a collection of notes and count the beats. If you need to, then refer to the chart titled 'The Note Names' to remind you of each note's beat length.
And remember that a 'quarter note' counts as 1.
Here are a two examples to give you the general idea.

Example 1: 2 + 1 + ½ = 3½ beats

Example 2: 1½ + ½ + ¾ + ¼ = 3 beats
Now have a go at the 'Count the Beats' quiz and test out your skills.

Note that a quarter note (i.e. a crotchet) equals 1 beat.
FEEDBACK
Correct answers in green
Incorrect answers in red
Score:
Ranking:
As you saw in Step 3, Naming Notes, here are 14 notes that you will be able to play on your whistle.
D, E, F#, G, A, B, c, c#, d, e, f#, g, a and b.
In this section, I'll show you where these notes lie on the musical 'stave'.
A musical note on the stave will either lie on a line or on a space between two lines. Providing you know the names of these lines and spaces, you'll be able to name every note.
The names of the notes on the lines and the spaces, as well as hints for how to remember them are shown below.


'How will I remember that?', I hear you cry.
There are lots of mnemonics for these five notes. Here are two that I quite like. If you don't like either of these, try making one up of your own.
Every Good Boy Deserves Fries
or
Every Good Bird Does Fly

You should now be able to read all the notes within the five lines and the four spaces of the stave. But what about notes that lie outside the stave—in particular, the note labelled 'D' at the bottom of the range and the three notes 'g', a' and 'b' which lie above the stave?
To notate these four notes, you just need to keep on going by extending the lettering beyond the stave. If necessary, insert a short 'ledger line' to indicate the next line (or lines) below or above the stave.
The notations for the bottom note D and for the three notes above the stave, g, a and b, are shown here.

Note that a ledger line has had to be inserted to indicate
the location of notes 'high a' and 'high b'.
I've provided two quizzes here, one for helping you to name the notes in the lower register and a more advanced one covering all the playable notes in the two registers combined.
Have a go at these quizzes now. If you can tackle each quiz several times, then so much the better as this experience will really speed up your sight-reading when you start to learn new tunes.
Learning the notation for the nine key notes in the lower register:
D, E, F#, G, A, B, c, c# and d.
Score:
Ranking:
Learning the notation for the fourteen key notes in both registers combined:
Lower register: D, E, F#, G, A, B, c, c#, d
Upper register: e, f#, g, a and b.
Score:
Ranking:
To consolidate your grasp of these musical notes, have a go at this bonus quiz. For each question you are given a short musical phrase of three or four notes which spell a word. Ignoring whether or not the note is upper or lower case, try to identify the words.
Score:
Ranking:
Jigs and Reels
As was explained in the section named 'ITM tune types', there's a wide variety of tune types to choose from, including the polka, hornpipe, waltz and slow air. But the most commonly played categories of tune played at Irish sessions are jigs and reels. For this reason, the 25 or so tunes that I've provided for you to play along with are all jigs and reels. Have a look now at the 'Play along with me' section of the website and have a go at these tunes now.
As well as providing standard music notation for each tune, I've included an audio recording which can be adjusted for speed.
Good luck!

1. Thanks to Paul Rosen for developing the excellent ABC reader. Have a look at his website:
editor.drawthedots.com
2. Thanks to Stuart Marshall for developing the great app Quizzer which I used in Steps 4 and 5. Have a look at his website: https://shakingthehabitual.com/stacks/quizzer/
